MP3 module
● MP3 module introduction

The MP3 module also known as Audio module , it is a high-performance audio codec module used to control and play MP3 files.
MP3 module function :
The MP3 module kit uses VS1053B as the main chip, supports MP3/WMA/OGG/WAV/FLAC/MIDIAAC and other audio formats decoding, and supports OGG/WAV audio format recording, supports high and low bass adjustment and Ear Speaker space effect settings.
The MP3 module kit has rich interfaces and complete functions. It only needs to provide power (3.3V/5V), and the module can be controlled by a microcontroller to realize functions such as music playback and recording.
● MP3 module hardware features
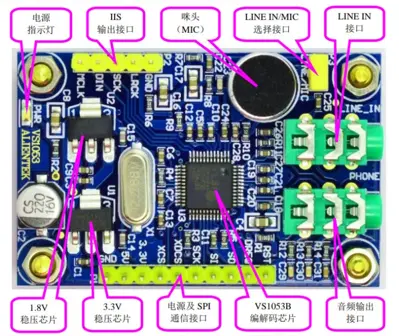
1. Onboard VS1053B high-performance codec chip, supports decoding of many audio formats, supports OGG/WAV encoding.
2. On-board voltage regulator circuit, only need to provide a 3.3V or 5V power supply externally to work normally.
3. Onboard 3.5mm headphone jack, you can directly insert headphones to enjoy high-quality music.
4. On-board microphone (MIC), it is mp3 module with mic , recording can be realized without external microphone
5. Onboard lIS output, can be connected to an external DAC for higher sound quality
6. On-board power indicator, the power-on status is clear at a glance
7. Using Class A PCB material, immersion gold process, stable and reliable
8. Using new component processing, pure copper gold-plated pin headers
9. Each interface is marked with silk screen, the interface position is designed and arranged reasonably, and it is easy to use.
10. The size of the PCB is 34mm*52.6mm, with mounting holes, small and delicate

● MP3 module datasheet
The MP3 module communicates with the external single-chip microcomputer through the SPI interface. The MP3 module can be directly connected to the 3.3V single-chip microcomputer system, and can also be conveniently connected to the 5V single-chip microcomputer system by means of a series resistance (see the following for details). The module comes with a voltage regulator chip, and only needs to provide 5V/3.3V voltage externally, which is very convenient to use. The parameters of the module are shown in the table:
| Project | Description |
|---|---|
| Interface features | 3.3V (After series resistance, it can be connected with 5V system) |
| Decoding format | MP3, OGG, WMA, WAV, MIDI, AAC, FLAC (need to load patch) |
| Encoding format | WAV (PCM/IMA ADPCM), OGG (patch needs to be loaded) |
| External Interface | 1 channel 3.5mm earphone interface, 1 channel 3.5mm LINE IN interface, IIS interface, power supply and control interface |
| Onboard recording | support |
| Other features | Volume control, treble and bass control, EarSpeaker spatial effect, decoding time output |
| MP3 Module size | 34mm*52.6mm |
| MP3 module function | Play song, record input, display lyrics, display song list, volume adjustment, fast forward and rewind, pause/play |
| DAC resolution | 18 bit |
| Total Harmonic Distortion (THD) | 0.07% (Max) |
| Dynamic range (A-weighted) | 100dB |
| SNR (S/N, SIGNAL-NOISE RATIO) | 94dB |
| Channel isolation (crosstalk) | 80dB@600Ω+GBUF 53dB@30Ω+GBUF |
| Microphone (MIC) amplification gain | 26dB |
| Microphone (MIC) Total Harmonic Distortion | 0.07% (Max) |
| Microphone (MIC) SNR | 70dB |
| LINE IN signal amplitude | 2800mVpp (Max) |
| LINE IN Total Harmonic Distortion | 0.014% (Max) |
| LINE IN SNR | 90dB |
| LINE IN impedance | 8OKΩ |
● How MP3 Module Realizes Audio Playback
The general audio file formats are MP3/WMA/OGG/WAV/MIDI/AAC and so on. Using the MP3 module to play audio files only requires a simple 3-step operation to achieve audio playback:
1) Reset the MP3 module .
Including hard reset (pulling down RST) and soft reset (setting the SM_RESET bit of the MODE register to 1), is to return the state of the MP3 module to the original state, ready to decode the next song.
Here we recommend that you perform a hardware reset and a software reset before each song is played, so that the music can be played better.
2) Configure the relevant registers of the MP3 module.
The registers we configure here include VS1053's mode register (MODE), clock register (CLOCKF), tone register (BASS), volume register (VOL) and so on.
3) Send audio data.
After the above two-step configuration, you need to input audio data into the MP3 module . As long as it is an audio format supported by the MP3 module , you can directly input it, and the MP3 module will automatically recognize it and play it.
However, it is necessary to send data in an orderly manner under the control of the DREQ signal, and cannot send data indiscriminately. The rule is simple: as soon as DREQ goes high, send 32 bytes to the VS1053 chip, then continue to wait for DREQ to go high until the audio data has been sent. After the above three steps, we can use the module to play music.
● How the MP3 module realizes recording
The MP3 module supports WAV recording in two formats: PCM format or IMAADPCM format. Among them, PCM (Pulse Code Modulation) is the most basic WAVE file format, which directly stores the sampled sound data without any compression. IAM ADPCM uses a compression algorithm with a compression ratio of 4:1. Here are the steps required for WAV recording:
1) Set the MP3 module PCM sampling parameters
We need to set important parameters such as PCM format (linear PCM), sampling rate (8K), number of bits (16 bits), number of channels (mono), and also select the sampling channel (microphone), including AGC settings etc. It can be said that the settings here directly determine the nature of our wav file.
2) Activate the PCM mode of the MP3 module and load the patch
By activating the PCM format of the MP3 module kit , let it start PCM data collection, at the same time, due to the BUG of the audio module , we need to load the patch to achieve normal PCM data reception
3) Create a WAV file and save the wav header
After the first two steps are successfully set, we can normally read the PCM data we need from SCI_HDATO, but before that, we need to create a new file and write the wav header before we can start writing Our PCM data.
4) Read PCM data
After the processing of the previous steps, this step is relatively simple, you only need to keep reading data from SCI_HDATO, and then save it into the wav file, but here we also need to do file size statistics, and write to wav at the end inside the head.
5) Calculate the entire file size, re-save the wav header and close the file
When ending the recording, we must know the size of the recording (data size and the entire file size), then update the wav header, rewrite the file, and finally because of FATFS, after the file is created, f_close must be called, and the file will be real It is reflected in the file system, otherwise it will not be written! So finally you need to call f_close to save the file.
● MP3 module experimentation

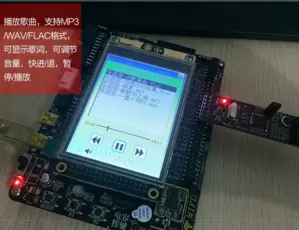
Play songs, support MP3/WMA/OGG/WAV/FLAC/MIDIAAC file formats, display lyrics, adjust volume, fast forward and backward, pause/play.
The MP3 module accepts the input audio data stream through the SPI interface. It can be a system slave or an independent host. Here it is used as a slave. We continuously input audio data to the MP3 module through the SPI port, it will automatically decode, and then output music from the output channel to realize the audio playback function.

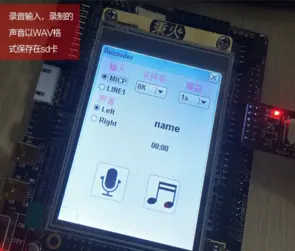
Recording input, the recorded sound is saved in the sd card in WAV format.
The MP3 module activates the PCM recording by setting the register, and then uses the software to load the patch to realize the recording function.
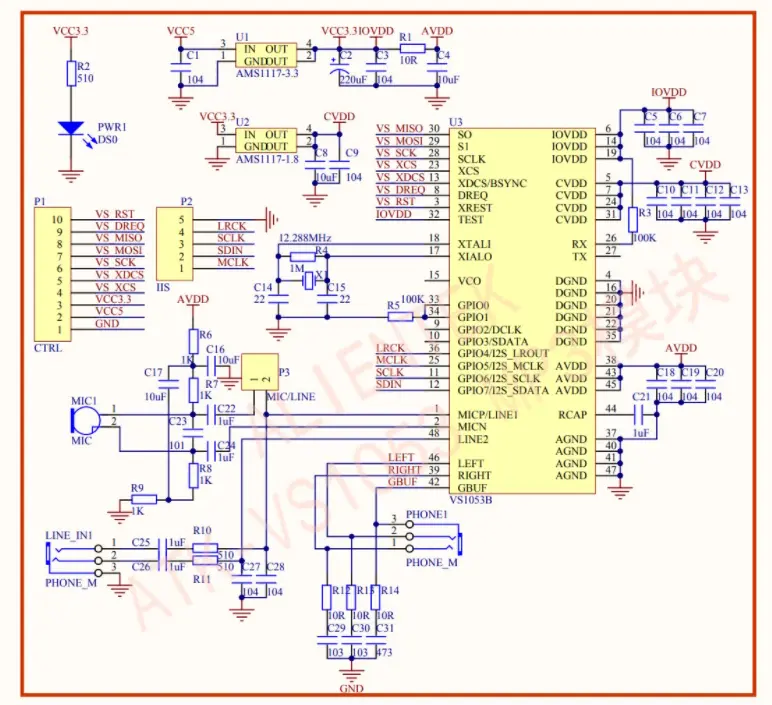
● MP3 module schematic
If you want to know more about types of mp3 module , or mp3 module function , and mp3 module price , welcome to contact us by click WHATSAPP.


